Posts tagged with “happynotes”

Migrated your moments from HappyFeed to HappyNotes

First, get your moments data

(function () {
  const MAX_WAIT_TIME = 50000; // If the button is always not there, we wait at most 50 seconds.
  const CHECK_INTERVAL = 1000; // If the button is not there, we do the same check after 1 scond
  const buttonSelector = '#__next > main > div > div.MomentHistory_moment-history__inner__a9etG > button';

  // Initially finding the button
  const button = document.querySelector(buttonSelector);
  if (button) {
    button.click();
    console.log('Found the button and clicked');
  } else {
    console.log('No Load button at all');
    return
  }

  // 当前已等待的时间
  let elapsedTime = 0;

  // 定时器开始循环查找,立即获得 intervalId
  const intervalId = setInterval(() => {
    elapsedTime += CHECK_INTERVAL;

    // Searching the Load button
    const retryButton = document.querySelector(buttonSelector);
    if (retryButton) {
      retryButton.click();
      elapsedTime = 0
      console.log('Found the button and clicked');
    } else {
      console.log('Could not find the button, continue searching...');
    }

    // If we could no longer find the button in MAX_WAIT_TIME, we know the work has been done.
    if (elapsedTime >= MAX_WAIT_TIME) {
      console.error('Could not find the button any more, stopping....');
      clearInterval(intervalId); // Stop the interval
    }
  }, CHECK_INTERVAL); // check if we can find the button every second
})()

Second, extract the data into a JSON object from the long page we get by clicking the Load button again and again by the script above

const diaryEntries = [];
const listItems = document.querySelectorAll('.MomentListItem_moment-list__item__d5UJL');

// Helper function:Convert date into yyyy-MM-dd format
function formatDate(dateString) {
    const months = {
        January: "01", February: "02", March: "03", April: "04", May: "05", June: "06",
        July: "07", August: "08", September: "09", October: "10", November: "11", December: "12"
    };
    const [month, day, year] = dateString.split(" ");
    return `${year}-${months[month]}-${day.padStart(2, '0')}`;
}

listItems.forEach(item => {
    const dateElement = item.querySelector('.MomentListItem_moment-item__date__XfMA8');
    const contentElement = item.querySelector('.MomentListItem_moment-item__text__F5V2C > p');
    const photoElement = item.querySelector('.MomentImage_root__uLWy7 img');
    const videoElement = item.querySelector('.MomentListItem_moment-item__video__16FUa video');

    const entry = {
        pdate: dateElement ? formatDate(dateElement.textContent.replace('Posted ', '').trim()) : null,
        content: contentElement ? contentElement.textContent.trim() : '',
        photo: ''
    };

    if (photoElement) {
        entry.photo = photoElement.getAttribute('src');
    } else if (videoElement) {
        const thumbnail = videoElement.getAttribute('poster');
        entry.photo = thumbnail ? thumbnail.trim() : '';
    }

    diaryEntries.push(entry);
    diaryEntries.reverse(); // make sure the old data is at the beginning
});

Third, send the moments data to HappyNotes by the following script

// Your personal token
const token = "eyJh...";

// API endpoint
const apiUrl = "https://happynotes-api.shukebeta.com/note/post";

// Function to send a note
async function sendNote(note) {
    const contentWithPhoto = note.photo 
        ? `${note.content}\n\n ![image](${note.photo})`
        : note.content;

    const payload = {
        isprivate: true,
        isMarkdown: true,
        publishDateTime: note.pdate,
        timezoneId: "Pacific/Auckland",
        content: contentWithPhoto
    };

    try {
        const response = await fetch(apiUrl, {
            method: "POST",
            headers: {
                Authorization: `Bearer ${token}`,
                "Content-Type": "application/json"
            },
            body: JSON.stringify(payload)
        });

        if (!response.ok) {
            throw new Error(`HTTP error! Status: ${response.status}`);
        }

        console.log(`Note sent successfully: ${await response.text()}`);
    } catch (error) {
        console.error(`Error sending note: ${error.message}`);
    }
}

// Send notes one by one
(async () => {
    var date = ''
    var minutes = '00'
    for (const note of diaryEntries) {
        if (note.pdate != date) {
           date = note.pdate
           minutes = '00'
        } else {
           minutes = (+minutes + 10) + ''
        }
        note.pdate += ` 20:${minutes}:00`
        await sendNote(note);
    }
})();

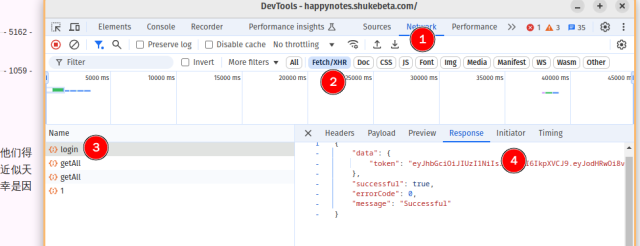
You need to get the token by a manually login. Don't share the token to anyone else! Anyone who gets the token can access your account and data. Follow the following steps to get your personal token.

Open the DevTools on Chrome or Firefox, then do a fresh login.
image

Step 6 in detail: Configure Telegram Sync in HappyNotes

If you haven't read Step1 to Step 5, click Step 1 ~ Step 5

  1. Open the HappyNotes App:

    • Open https://happynotes.shukebeta.com with your favorite broswer and then navigate to the **Settings** page.
  2. Access Telegram Sync Settings:

    • Within the Settings page, look for the "Note Sync - Telegram" option.
    • Tap on it to open the sync settings page.
  3. Add a New Sync Configuration:

    • On the sync settings page, click on the "+ Add" button to create a new sync configuration.
  4. Enter the Required Information:

    • Source Note Choose the appropriate source note to sync from the options provided (e.g., Public, Private, All, Tag).

      • All - for backup purpose. It will sync every new note to the channel you specified. (Please don't use a public channel if you have any private notes!!!)
      • Private - only sync private notes to specified channel, you definitely should not use a public channel for this type of notes!
      • Public - only sync public notes to specified channel - if you use a telegram channel for your blog or microblog purpose, this option is for you!
      • Tag - only sync notes that are tagged with specific tag, You must know that it does not check the private/public flag, every new note that has the specified tag will be sent to the specified channel.
    • Channel Id: In the "Channel Id" field, enter the Channel Id you obtained earlier which looks like -100123456789.

    • Channel Name: This is a remark for the channel id, you can use the same channel name on Telegram or anything else you want.

    • Telegram Bot Token: In this field, paste your Telegram Bot Token . I strongly recommend you to use copy/paste feature instead of manually typing the token to avoid typos.

    • **Token Remark: ** Just like the channel name, this Token Remark helps you remember which token you are using for this channel. You can use your bot's name or anything else you want.

  5. Save the Configuration:

    • After filling in the details, click the "Save" button to store your sync configuration.
  6. Test the Sync Setting:

    • Once saved, you'll see your new configuration listed on the sync settings page.
    • Tap the "Test" button to send a test message to your Telegram channel.
    • If the test is successful, you’ll receive a confirmation message in your Telegram channel indicating that the sync is working, and the Test button will disappear.
  7. Activate or Adjust Sync Settings:

    • You can Disable or Activate or Delete a setting based on your requirements.
    • Make sure your bot is active and configured correctly to ensure smooth synchronization.

How to Sync Your Telegram Channel with HappyNotes

Happy Notes app recentlys supports to sync new notes to your specified telegram channel based on the rules you set. If you want to enjoy seamless note synchronization between your Telegram channel and the HappyNotes app, follow these easy steps:

Step 0: Find and Add @getidsbot

  • Open Telegram and search for @getidsbot.
  • Start a chat with the bot by clicking on "Start."

Step 1: Create Your Telegram Bot

  • Search for @BotFather in Telegram and start a conversation.
  • Use the /newbot command to create a new bot.
  • Follow the prompts to give your bot a name and username.
  • Note: The bot's username must end with "bot" (e.g., MySyncBot).

Step 2: Get Your Telegram Bot Token

  • After creating the bot, @BotFather will provide you with a token. This token is essential for integrating your bot with other services, so keep it safe.

Step 3: Add Your Bot to Your Telegram Channel as an Admin

Convenient Method:

  1. Open the conversation with your newly created bot in Telegram.
  2. Tap on the bot's icon in the top right corner.
  3. Click on "Add to Group or Channel".
  4. Select the channel you want to add the bot to, and it will automatically be added as an admin with the necessary permissions.

Alternative Method:

  1. Go to your Telegram channel's settings.
  2. Select "Administrators" and manually add your newly created bot as an admin.
  3. Ensure the bot has the necessary permissions to send and manage messages.

Step 4: Manually Write the First Message to the Channel

  • Send a message to your channel as you usually would. This message is necessary to identify the channel ID later.

Step 5: Forward the Message to @getidsbot

  • Forward the message you just sent to @getidsbot.
  • The bot will reply with the channel ID. Keep this ID safe; you’ll need it for the next step.

Step 6: Configure Telegram Sync in HappyNotes

Step 7: Test the Setting

  • Use the "Test" option in HappyNotes to send a test message to your Telegram channel.
  • Ensure the message is successfully sent, confirming the integration is working.

Step 8: Enjoy Syncing Your Notes with Telegram!

  • With everything set up, your notes will now sync with your Telegram channel automatically.
  • You can now easily access your notes from within Telegram, making your workflow even smoother.