Say you expose an Anthropic-compatible gateway on the public internet and put nginx Basic Auth in front of it. Point Claude Code at it and every request 401s — or worse, the gateway rejects it with a cryptic error. The reason is a header collision, and it's easy to untangle once you see it.
Basic Auth lives in the Authorization header (Authorization: Basic <base64>). Claude Code's own auth also wants a header — but which one depends on how you authenticate:
ANTHROPIC_API_KEY → sent as X-Api-KeyANTHROPIC_AUTH_TOKEN (and subscription/OAuth login) → sent as Authorization: Bearer <token>
So the trick is to stay in API-key mode. Then Authorization is free for Basic Auth and your key rides in the separate X-Api-Key header — no collision:
export ANTHROPIC_BASE_URL="https://gateway.example.com"
export ANTHROPIC_CUSTOM_HEADERS="Authorization: Basic $(echo -n 'user:pass' | base64)"
export ANTHROPIC_API_KEY="<your-key>"
unset ANTHROPIC_AUTH_TOKEN   # Bearer would fight Basic for the Authorization header
On the nginx side, strip the client's Authorization after Basic Auth passes, so the Basic credential never leaks upstream to the gateway:
location / {
    auth_basic           "gateway";
    auth_basic_user_file /etc/nginx/.htpasswd;

    proxy_pass http://backend:9949;
    proxy_set_header Authorization "";   # consumed by auth_basic; don't forward
}
Two gotchas worth knowing. If you're logged into Claude Code with a subscription, it sends Authorization: Bearer <oauth> and ignores ANTHROPIC_API_KEY — so it collides with Basic and never sends X-Api-Key. Log out (or use a config dir with no login) to force API-key mode. And if your gateway reads a pool/backend selector from X-Api-Key (some proxies do), the value must be the selector name, not a real sk-ant-... key — a real key or a dummy matches no pool and fails closed.
The failure mode that eats the most time isn't any of the above, though: a typo in the variable name. ANTROPIC_API_KEY (missing the H) sets nothing, Claude Code silently falls back to whatever else it can find, and you'll chase the server for an hour before spotting the letter. Echo env | grep -i anthropic before blaming the proxy.
You SSH through a bastion box. So you copied your private key onto it. Now that key lives on one more machine — one more place it can be stolen from, one more copy to rotate when something goes wrong.
SSH agent forwarding removes the need entirely.
What it actually does
This is the part most explanations hand-wave past. Your private key never needed to be on the bastion — that's not how SSH auth works.
- The target machine needs your public key (in
~/.ssh/authorized_keys). It always did.
- The client (you) holds the private key and signs a challenge the target sends.
Without forwarding, when you SSH from the bastion to a third machine, the bastion becomes the client — so it needs the private key to sign. That's the only reason you ever copied it there.
With forwarding, the bastion doesn't sign anything itself. It forwards the challenge back to your agent on your laptop, your agent signs it, and the signature travels back. The bastion never touches the private key.
No forwarding:   laptop (key) → bastion (key) → target (pubkey)
With forwarding: laptop (key+agent) → bastion (no key) → target (pubkey)
Setup
- Load your key into the agent on your laptop (the agent is usually already running):
ssh-add ~/.ssh/id_rsa
- Enable forwarding for the bastion in
~/.ssh/config:
Host bastion
    HostName bastion.example.com
    User myuser
    ForwardAgent yes
- Verify it works:
ssh bastion
ssh-add -l        # lists your keys → forwarding is live
ssh internal-vm   # connects, bastion never had your key
The catch
Only forward through machines you trust. Anyone with root on the bastion can request signatures from your agent while your session is open — effectively borrowing your identity. Never use -A on a shared or untrusted host.
Do you still need it with a passphrase-less key?
If your key has no passphrase and you've already copied it everywhere, forwarding isn't strictly required — direct auth from the bastion works fine. But keep ForwardAgent yes in the config anyway. It costs nothing, and the day you switch to a passphrase-protected key, you'll only ssh-add once on your laptop instead of typing the passphrase on every connection.
docker network ls
then
docker network rm networkname
昨天才注意到我的 racknerd vps被墙了。换一个IP要 $3,虽然不贵,但racknerd并不能保证新IP是没有被墙的。
网上东搜西搜,有人建议用 cloudflare CDN 挽救,但这样只能解决一个端口(即443),无法享受到 kcptun 加速的快乐。
还有其他的法子吗?我想到了Tailscale。如果你身在墙内,由于VPS IP已经被墙,你无法直接连接。但你可以用 azure cloud terminal 或者其他云服务商提供的 cloud terminal,因为他们的云Shell到你的vps通常都是通的。
我很懒惰,下面简要罗列主要步骤:
- vps端安装 tailscale
- 为方便记忆,解析 vps tailscale IP到一个域名(可选)。如果你没有个人域名,有个免费的解决方案是去 eu.org 申请一个终身免费的二级域名。(申请后要等几天才能收到回信)
- 你的墙内设备或者路由器上(openwrt)安装 tailscale,使用同一个账号,这样墙内设备与墙外设备就处于同一个内网
- 连接 vps 的tailscale IP或者指向tailscale IP的域名,实现翻墙
这样当然是有局限性的啦,除非你利用openwrt得到一个无墙的wifi,你每个设备都要安装tailscale。这也不是什么坏事,tailscale这个利器,早装早享受。说不准啥时候就能救你一次!
I recently signed a new broadband contract with One NZ and received a HUAWEI DN8245X6-10 wifi router. This new router offers WIFI6 connection, which is faster than the Vodafone UltraHub. Unfortunately, I was unable to get port forwarding to work on this router, which was quite frustrating. Even One NZ's customer support couldn't assist me, as they admitted to not having training on port forwarding support. However, they did provide me with some useful information - One NZ doesn't block any ports, and the old Vodafone Ultrahub can also support the cable modem. This gave me some hope. I decided to use the Vodafone Ultrahub as the main router and DN8245 as a secondary WIFI router. After spending a few hours on it this afternoon, I finally made it work. Here are the key steps.
-
Connect the Ultrahub's WAN port to the cable modem. I didn't change any settings; it simply works. I was happy to find that the port map settings work with this new HFC broadband as well!
-
Connect the DN8245X6-10's WAN port to one of the LAN ports of the Ultrahub.
-
Go to http://192.168.1.1/ and log in to the router using "admin" as the username and the password printed on the router. 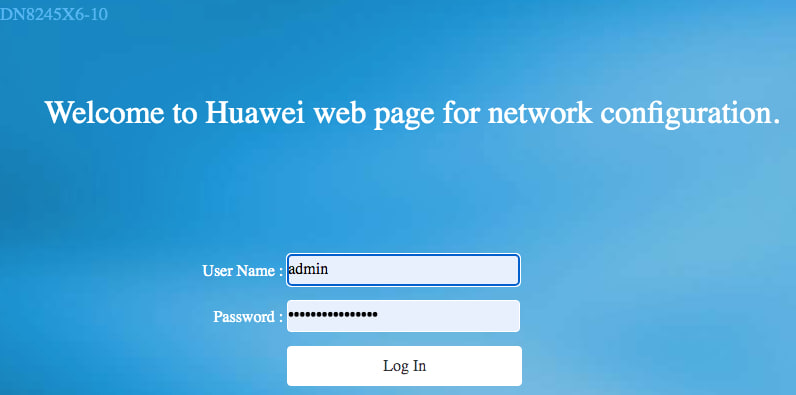
-
Go to Advanced => Wan.
- Remove all three existing WAN interfaces.
- Create a new one with the following settings.
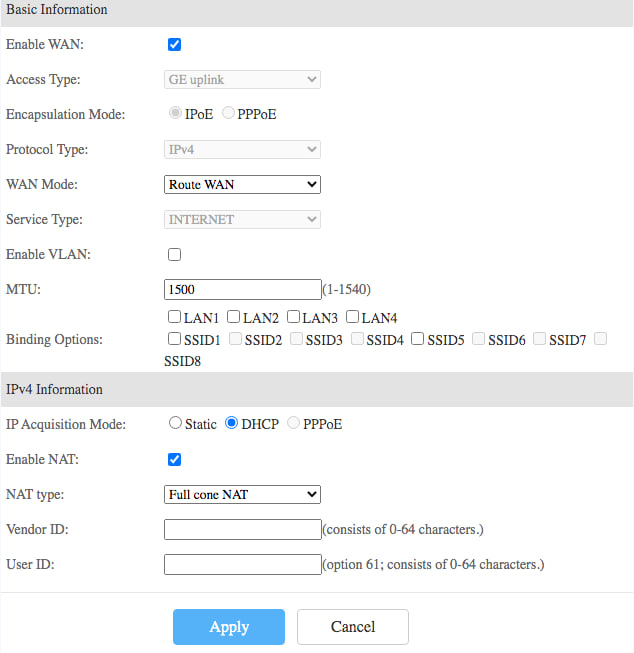
- Apply.
-
Go to Route => IPV4 default route. (I spent at two hours before I found this step is critical)
- Enable default route.
- Set the new WAN interface you just created as the default route.
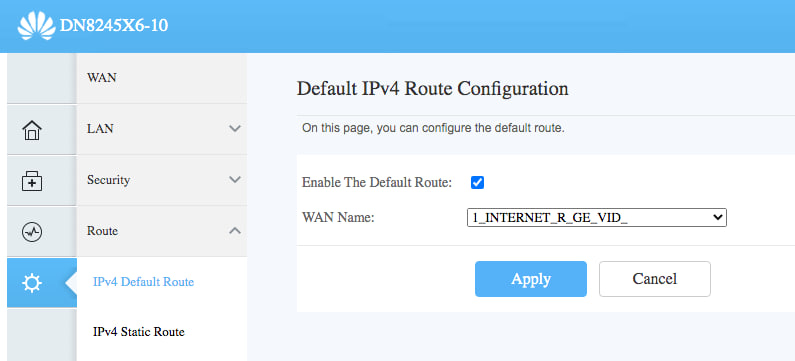
- Apply
And, that's all! BTW, don't waste your time to try to set a bridge wan. It simply doesn't work:cannot get an IP from master router for unknown reason.