I managed to set up debian 11 on a Toshiba Chromebook2, model CB35-B3340 and a Dell Chromebook 11 3120 P22T00
WIFI/Sound/HDMI all work well, which satisfies me.
-
Firstly, switch Chromebook into developer mode
- Visit Debian and use dd command to create a bootable usb stick with a minimal iso
-
Visit MrChromebox
- Install/Update UEFI (Full ROM) firmware (the Sea bios)
-
Boot from the usb stick and setup the minimal system
- Allow debian use all 15G space with LVM, no separate partitions
- Skip wifi setup as we don't have the firmware at that moment
-
Boot from the chromebook into debian without GUI, without network
-
Plug a usb realteck 8139 ethernet card and so I get internet connection:
- add non-free and main contrib source line to
/etc/apt/sources.list file:
deb http://mirror.fsmg.org.nz/debian bullseye main contrib non-free
-
apt install firmware-iwlwifi, firmware-intel-sound
-
apt install gnome-core (wifi works from now)
-
plug off the usb ethernet card and reboot
-
Other settings
- Remove old kernels to save space, Help Reference
- Settings => Power => Disable auto suspend when plug in
- Run
sudo apt clean
- Restrict journal log max size by
vim /etc/systemd/journald.conf and uncomment the SystemMaxUser=50M line, and then systemctl restart systemd-journald
I recently signed a new broadband contract with One NZ and received a HUAWEI DN8245X6-10 wifi router. This new router offers WIFI6 connection, which is faster than the Vodafone UltraHub. Unfortunately, I was unable to get port forwarding to work on this router, which was quite frustrating. Even One NZ's customer support couldn't assist me, as they admitted to not having training on port forwarding support. However, they did provide me with some useful information - One NZ doesn't block any ports, and the old Vodafone Ultrahub can also support the cable modem. This gave me some hope. I decided to use the Vodafone Ultrahub as the main router and DN8245 as a secondary WIFI router. After spending a few hours on it this afternoon, I finally made it work. Here are the key steps.
-
Connect the Ultrahub's WAN port to the cable modem. I didn't change any settings; it simply works. I was happy to find that the port map settings work with this new HFC broadband as well!
-
Connect the DN8245X6-10's WAN port to one of the LAN ports of the Ultrahub.
-
Go to http://192.168.1.1/ and log in to the router using "admin" as the username and the password printed on the router. 
-
Go to Advanced => Wan.
- Remove all three existing WAN interfaces.
- Create a new one with the following settings.
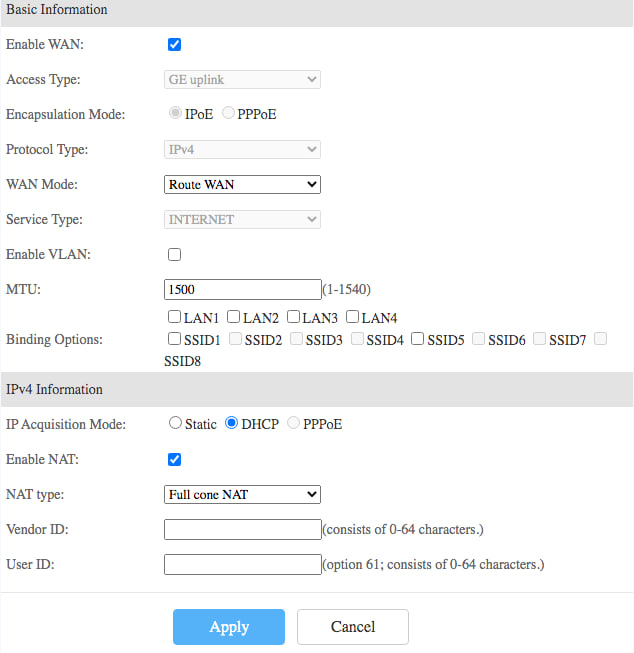
- Apply.
-
Go to Route => IPV4 default route. (I spent at two hours before I found this step is critical)
- Enable default route.
- Set the new WAN interface you just created as the default route.
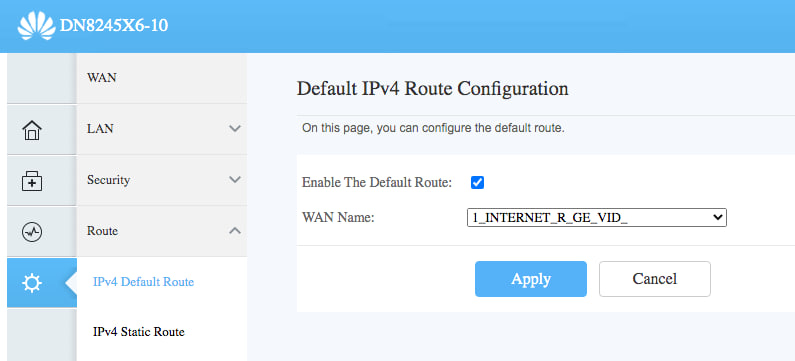
- Apply
And, that's all! BTW, don't waste your time to try to set a bridge wan. It simply doesn't work:cannot get an IP from master router for unknown reason.
这个博客使用了 Chyrp-lite 项目,当初之所以选择它,一方面觉得看上去还行,另一方面是因为它是 PHP 写的,而我曾经是一个老PHP程序员,这样万一遇到点什么小毛病可以自己改。我最近知道了一种新字体:汇文明朝体。怎么说呢,这个字体在八十年代相当流行。我那个时候读过的书,多是这种这种印刷体。不知道什么人把它搬到了互联网上,我先是把它用到了我最喜欢的读书app 多看阅读上,今天又琢磨把它移植到我的博客上。闲话少绪,说干就干, 在ChatGPT的帮助之下,把字体转成woff2格式,再改一个CSS文件,不到半小时就整好了。
--- a/themes/blossom/stylesheets/all.css
+++ b/themes/blossom/stylesheets/all.css
@@ -1,8 +1,16 @@
+@font-face {
+    font-family: 'Huiwen Mingchao font';
+    src: url('../../../fonts/汇文明朝体.woff2') format('woff');
+    font-weight: normal;
+    font-style: normal;
+    unicode-range: U+4E00-9FFF;
+}
 @font-face {
     font-family: 'Open Sans webfont';
     src: url('../../../fonts/OpenSans-Regular.woff') format('woff');
     font-weight: normal;
     font-style: normal;
+    unicode-range: U+0020-007E;
 }
 @font-face {
     font-family: 'Open Sans webfont';
@@ -58,8 +66,8 @@ html[lang="he"] {
     background-color: #208448;
 }
 body {
-    font-family: "Open Sans webfont", sans-serif;
-    font-size: 1rem;
+    font-family: "Huiwen Mingchao font", "Open Sans webfont", sans-serif;
+    font-size: 1.2rem;
     color: #1f1f23;
     line-height: 1.5;
     background-color: #f7f5ed;
最近 temu (拼多多海外版)很火,老是鼓动着我花钱。这不,满$150刀减$40的优惠券就在那儿晃啊晃,你说我是买啊还是买啊?当然是买买买了!正巧我的老MacBook Pro (Mid 2010) 硬盘才128G,而我的次老MacBook Pro(Mid 2015)硬盘也才256G,都该换了。但我并不想出太多血,所以下单了杂牌 Derlar 512G 和 1T硬盘各一支,又加了一个type-c接口的sd卡读卡器拼单,优惠后 $112.74 包邮。4月8号下的单,今天收到货,爽呆呆。
然而升级过程并非一帆风顺,中间冷汗也是流了不少。
我的这台机器,上次光驱换成128G SSD不久之后,老硬盘就不能识别了。我那会就把老硬盘拆掉当外置硬盘使用。
这次我打算先试试双硬盘,把新盘放到原来的硬盘位置,结果系统不认,小汗,不过因为之前老硬盘也出过时认时不认的问题,我并没有很担心。也许就是线坏了。把新盘换光驱位置,认出来了,开心!
但装系统仍然是个麻烦事。我的次老MacBook Pro是最新系统,而这台老MacBook Pro只支持到 High Sierra,我只好又把老SSD接回去,制作好USB引导盘。再把新硬盘装回去,眼看着顺利进入了系统安装界面,我就放心的出门散步去了。然而...
等我散步回来,机器是关机状态。不对啊。哦,其实不是关机状态,是无限重启状态。这可不是什么好现象。网上搜了一下,说啥的都有。最悲观的说法是硬盘不兼容。可别呀!
Option+Command+Shift+R 进去看了看,咦?新盘的文件系统我怎么用的是 Mac OS Extended (Journaled),记得从 High Sierra起改用APFS了不是?于是重新格式成APFS再安装一遍。漫长的等待之后,成了!
哼!想搞我,没那么容易。不过还是出了一身冷汗。毕竟退货啥的怪麻烦。
You must have known that I just migrated this blog site to a VPS hosted on oracle cloud, while this wiki page is too brief to get a workable environment easily.
Here is the note for this migration.
- sudo -i
- Install packages that chyrp will need
apt install php8.1 php8.1-xml php8.1-fpm php8.1-mysql php8.1-mbstring mysql-server nginx certbot python3-certbot-nginx
- Set a password for 'root'@'localhost' account on this new mysql server
    ALTER USER 'root'@'localhost' IDENTIFIED WITH mysql_native_password BY 'your_new_password';
    FLUSH PRIVILEGES;
- Run mysql_secure_installation to
- Remove anonymous users
- Disallow root login remotely
- Remove test database and access to it
- Create a common user for the blog database, and the blog database
    CREATE USER 'blog'@'localhost' IDENTIFIED BY 'superdifficultpassword';
    GRANT ALL PRIVILEGES ON blog.* To 'blog'@'localhost' WITH GRANT OPTION;
    FLUSH PRIVILEGES;
    CREATE DATABASE `blog` /*!40100 DEFAULT CHARACTER SET utf8mb4 COLLATE utf8mb4_0900_ai_ci */ /*!80016 DEFAULT ENCRYPTION='N' */;
- Put
.my.cnf with the following content in home directory
[client]
user=blog
password=yoursuperdifficultpassword
host=localhost
- Restore the database backup
mysql blog < blog_20230408-030501.sql
- Setup nginx and https certificate with certbot
- Setup renew the certificate by crontab
SHELL=/usr/bin/bash
PATH=/usr/local/sbin:/usr/local/bin:/sbin:/bin:/usr/sbin:/usr/bin
15 0 * * * /usr/bin/certbot --nginx renew > /dev/null
- Restore previous installation, overwrite with the latest version, do the upgrade, that's it!